LiDAR Technology & FAQ
How Long Does a LiDAR Scan Actually Take?
July 2026
SmartScanz Editorial
6 min read
It's one of the most common questions before a project starts: how long is this actually going to take? The honest answer depends on a few key variables — but for most projects it's much faster than people expect.
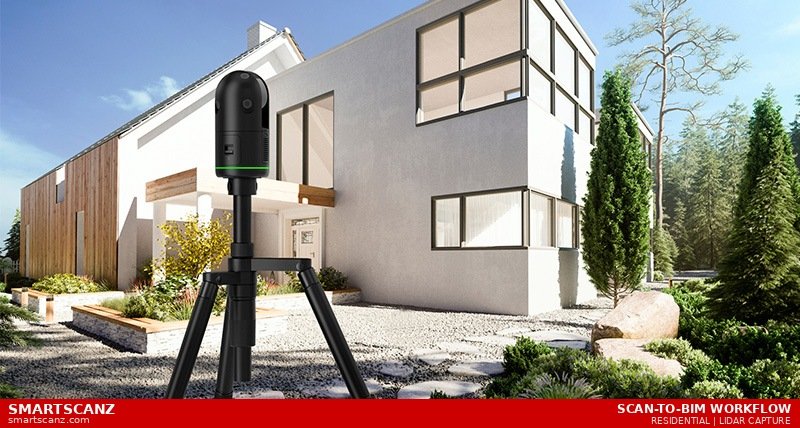
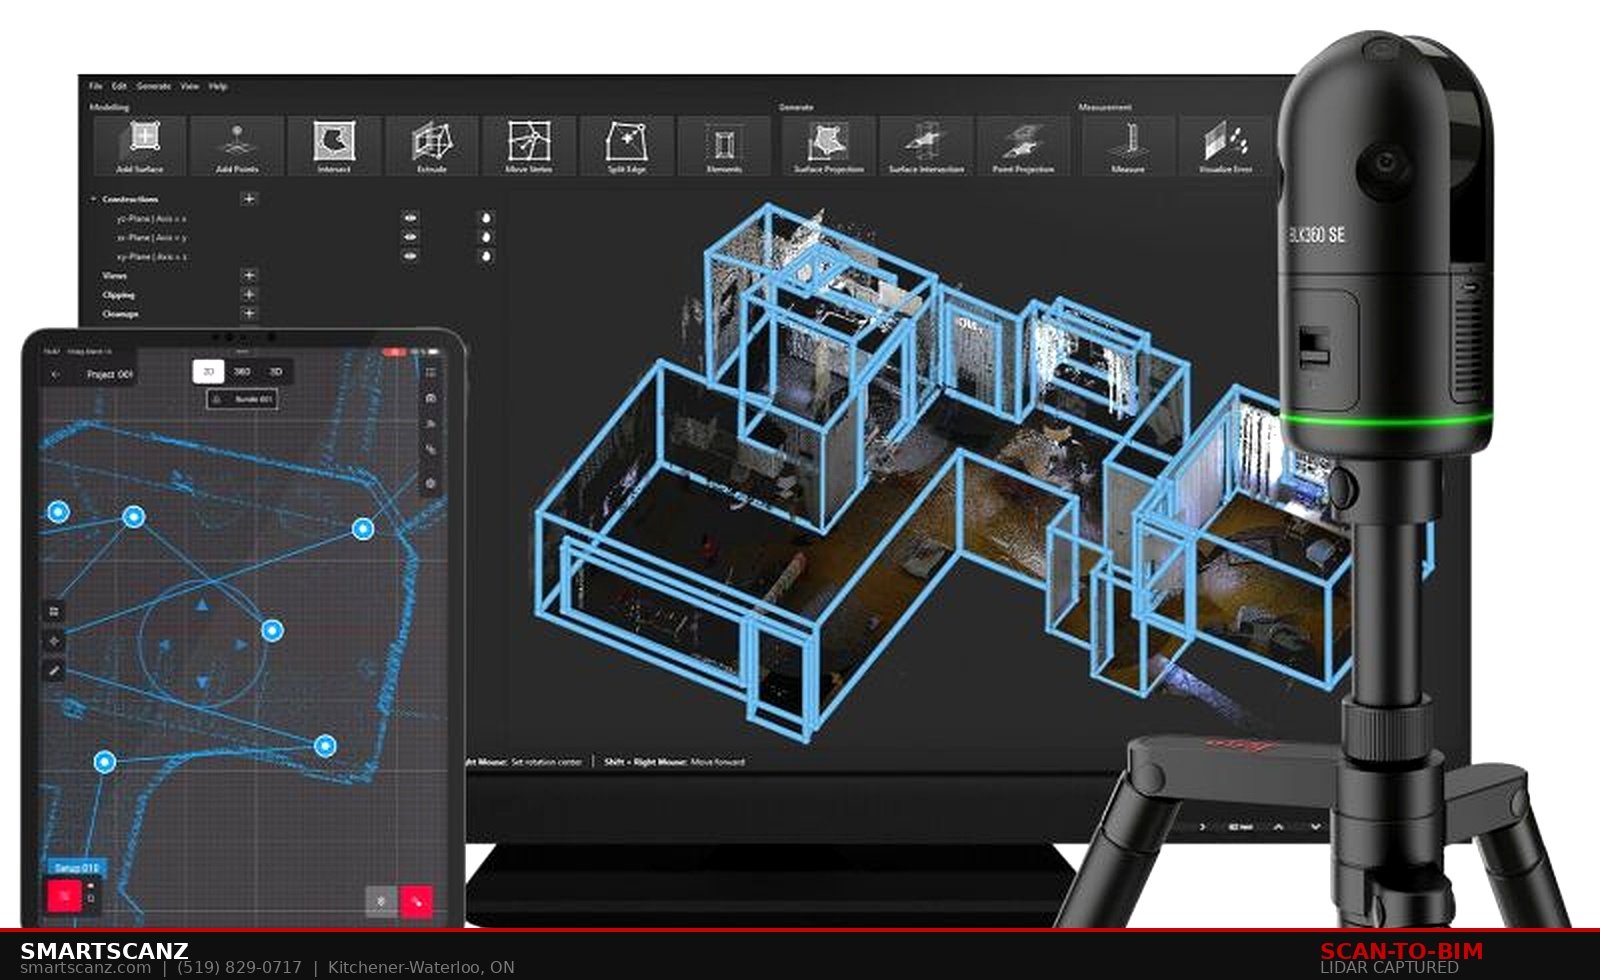
The Leica BLK360 Gen2 captures a full 360° point cloud in under 20 seconds per position. A typical residential home takes 2–4 hours on site. A small commercial space, 2–6 hours. A large commercial building, 1–3 days. And unlike traditional measuring, it's always a single visit — no return trips for missed dimensions.
Scan Time by Building Type
Single room: 15–30 min. Small residential (under 1,500 sq ft): 1–2 hours. Medium residential: 2–3 hours. Small commercial: 2–4 hours. Medium commercial: 4–8 hours. Deliverables are produced back in the office and typically delivered within 5–10 business days of the site visit.
What Affects Scan Time
Number of floors, complexity of the space, whether exterior elevations are needed, building occupancy, and scan density setting all affect how long we're on site. The full article breaks each factor down with real numbers.
One visit — all data. Everything visible during the scan is captured permanently and precisely. No return trips. No missed dimensions. No follow-up visits.
Get real scan time estimates for your specific project type — plus answers to the most common questions about LiDAR field operations.
Read the Full Article →
Rental & Buyer's Guide
Renting a LiDAR Scanner vs Hiring a Scanning Company — Which Is Right for Your Project?
July 2026
SmartScanz Editorial
7 min read
LiDAR scanning has become essential across construction, architecture, engineering, insurance, and renovation. The question most first-time buyers ask is straightforward: should I rent the scanner and do it myself, or hire a professional scanning company to handle everything?
The honest answer is that it depends entirely on your project — what you need to capture, what you plan to do with the data, and whether your budget is better spent on equipment or expertise.
Renting Makes Sense When...
You have in-house staff comfortable with point cloud software, you need to scan multiple sites over several days, or you want the raw data for your own BIM or CAD workflow. Rental starts at $450/day CAD and includes the Leica BLK360 Gen2, tripod, iPad with Cyclone Field 360, and phone support from our team throughout your rental.
Full-Service Makes Sense When...
You need finished deliverables — floor plans, Revit models, elevations — not just raw point cloud files. Or when the project involves insurance documentation, permit applications, or professional accountability. Full-service means our team handles everything from field capture to final outputs.
The Hidden Cost of DIY
Renting looks cheaper per day — but only if you have the capability to use the data. Point cloud processing software, staff time, and the learning curve all add up. If you end up hiring someone to process the data anyway, full-service often costs less overall.
SmartScanz offers both. Scanner rental from $450/day with free local pickup in KW, or full-service LiDAR scanning with finished deliverables. Not sure which fits? Contact us and we'll give you an honest recommendation.
View full rental details, pricing, and kit contents — or get a full-service quote for your project.
Read the Full Article →
Insurance & Restoration
How to Document Property Damage for an Insurance Claim
June 2026
SmartScanz Editorial
8 min read
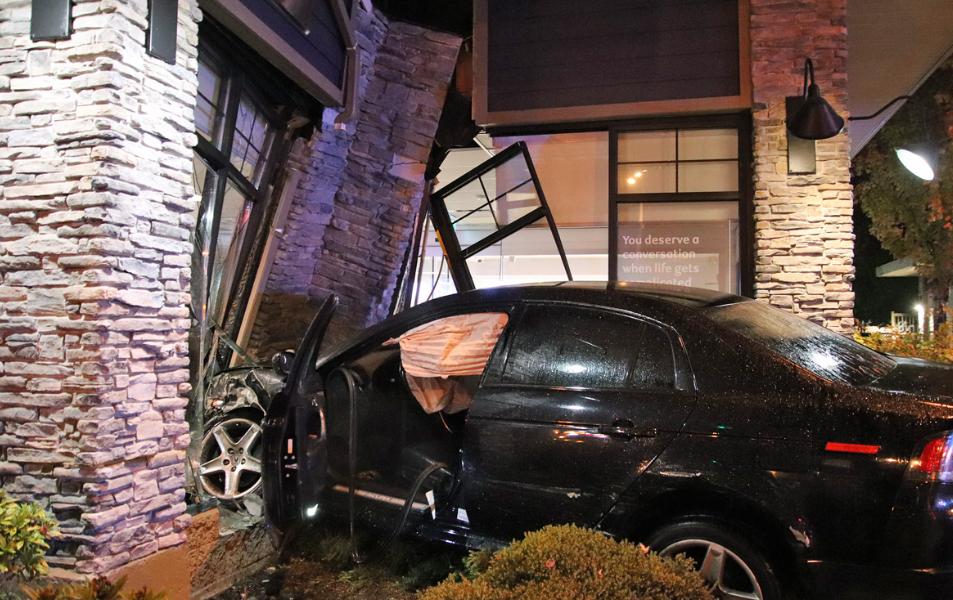
When a vehicle drives through a storefront, a fire tears through a commercial building, or a burst pipe floods a multi-unit residence, the clock starts immediately. Insurance adjusters need evidence. Restoration contractors need scope. Building engineers need structural data. And property owners need documentation that will hold up through every stage of the claims process.
The problem is that traditional damage documentation — photographs, tape measurements, handwritten notes — is incomplete, inconsistent, and increasingly challenged by insurers and legal teams. LiDAR scanning has changed the standard.
Why Traditional Documentation Falls Short
A smartphone photo captures what the camera sees from one angle, at one moment. A tape measure gives you a dimension between two points. Neither tells the full story of structural deformation, displacement, or the true three-dimensional extent of damage across a building. In the context of an insurance claim, incomplete documentation creates disputed scope, missed damage, and no baseline for comparison.
What LiDAR Documentation Captures
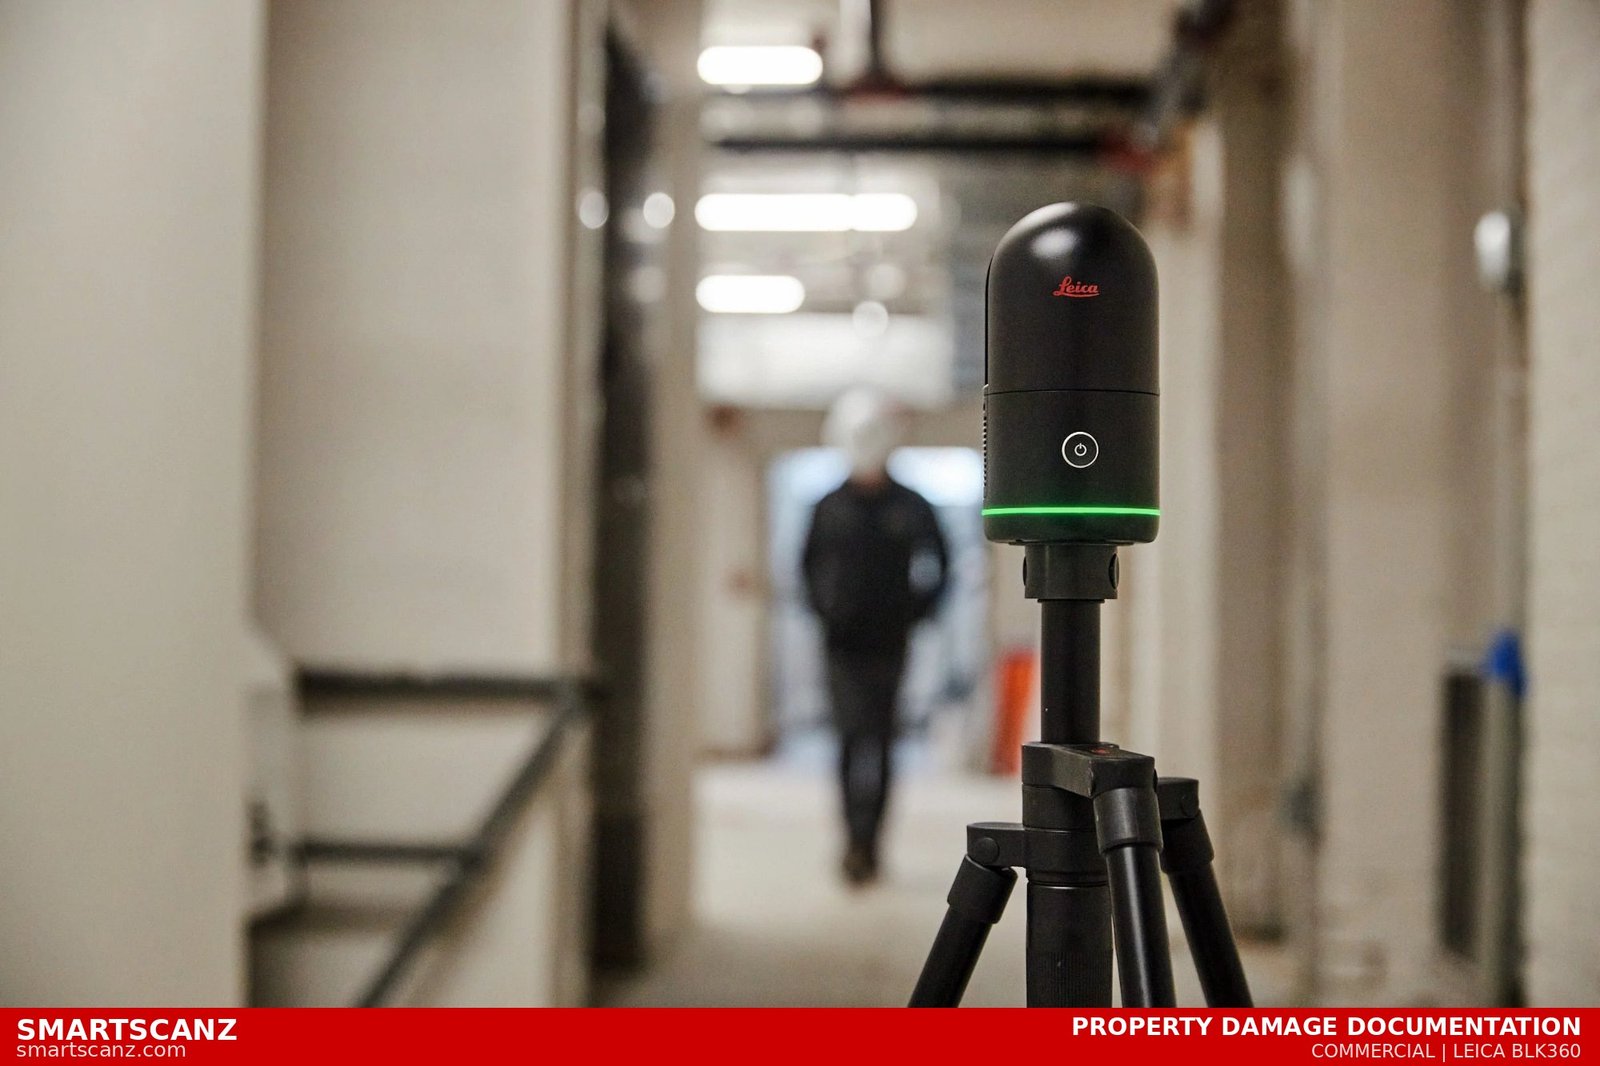
The Leica BLK360 Gen2 captures a complete 360° point cloud of the damage scene in under 20 seconds per position — accurate to ±4mm — with full HDR colour overlay. In a single site visit, we document the complete interior and exterior geometry of the damaged structure, exact dimensions of every affected element, visible deformation and structural movement, and the precise footprint and extent of damage. The result is a permanent, timestamped 3D record that can be measured and presented at any point in the future.
Who Uses LiDAR for Property Damage
Insurance adjusters get a defensible, measurement-grade record that reduces disputes and accelerates settlements. Restoration contractors work from accurate existing conditions data, reducing change orders. Structural engineers get precise deformation data that photographs simply cannot provide. Legal teams get timestamped 3D evidence that preserves the scene regardless of what happens to the physical structure afterward.
Rapid deployment: SmartScanz mobilizes across Kitchener-Waterloo, the GTA, Hamilton, Burlington, and surrounding regions. We document the scene before restoration work begins wherever possible.
Need property damage documentation? SmartScanz deploys fast across KW, GTA, Hamilton, and beyond.
Read the Full Article →
Pricing Guide
What Does a Scan-to-BIM Project Actually Cost in Ontario?
March 2026
SmartScanz Editorial
7 min read
It's the first question almost every architect, contractor, or property owner asks: how much does this actually cost? The honest answer is that Scan-to-BIM pricing in Ontario varies significantly depending on the size of the building, the level of detail required, and what deliverables you need at the end. This article breaks down exactly how pricing works, what drives costs up or down, and what you should expect to pay for a professional Scan-to-BIM project in Kitchener-Waterloo, Toronto, Hamilton, or anywhere in Ontario.
The Two Components of Every Scan-to-BIM Project
Every Scan-to-BIM project has two distinct phases, each with its own cost: the LiDAR scan itself, and the BIM modelling that follows. Understanding each component separately makes it much easier to evaluate quotes from different providers.
The LiDAR scan is the site work — a technician arrives with a professional scanner (like the Leica BLK360 Gen2), captures the building in full 360° detail from multiple positions, and processes the raw data into a registered point cloud. This is charged based on building size and complexity, not time spent on site.
The BIM modelling is the office work — a modeller imports the point cloud into Revit and builds the 3D model element by element. This is where the Level of Detail (LOD) has the biggest impact on cost. An LOD 200 model of the same building costs significantly less than an LOD 350 model.
Key insight: When comparing quotes, always confirm whether the price includes both the scan AND the model, or just one of the two. Many providers quote the scan only and bill modelling separately.
Scan-to-BIM Pricing by Building Size
Here is a realistic breakdown of what a full Scan-to-BIM project — including LiDAR scan, point cloud processing, and Revit model at LOD 300 — typically costs in Ontario:
| Building Type |
Size |
Typical Range |
| Small residential | Up to 2,000 sq ft | $1,200 – $2,500 |
| Medium residential | 2,000 – 5,000 sq ft | $2,500 – $4,500 |
| Small commercial | Up to 5,000 sq ft | $2,000 – $4,000 |
| Medium commercial | 5,000 – 20,000 sq ft | $4,000 – $9,000 |
| Large commercial | 20,000 – 50,000 sq ft | $9,000 – $20,000 |
| Industrial / complex | 50,000+ sq ft | Custom quote |
These ranges assume a standard LOD 300 model with architectural elements (walls, floors, ceilings, doors, windows, stairs). MEP content, structural elements, and higher LOD levels add cost.
LOD 200Lowest cost — massing only
LOD 300Most common — construction docs
LOD 350+Highest cost — coordination
What Drives the Cost Up
Higher Level of Detail. Moving from LOD 200 to LOD 350 can increase modelling costs by 40–80% on the same building. Every additional element — MEP systems, structural connections, millwork details — adds modelling time.
Complex geometry. Buildings with curved walls, irregular floor plates, vaulted ceilings, or significant heritage detailing require more scan positions and more modelling time than rectilinear commercial buildings of the same square footage.
Multiple buildings or phases. If your project spans multiple structures or requires phased delivery, mobilization costs apply to each visit.
MEP content. Adding mechanical, electrical, and plumbing systems to a Revit model is labour-intensive. Expect MEP to add 30–60% to the base architectural model cost.
What Drives the Cost Down
Simple, rectilinear spaces. Open floor plate offices, warehouses, and standard residential layouts are the fastest to scan and model. Cost per square foot drops significantly on simple geometry.
Lower LOD requirements. If you only need a schematic model for early-stage design or clash coordination, LOD 200 delivers what you need at a lower price point.
Local provider. A Kitchener-Waterloo based company like SmartScanz has no travel premium for projects in KW, Cambridge, Guelph, or Hamilton. A Toronto firm serving the same market adds $200–$600 in travel costs to every project.
Scan-to-BIM vs. Traditional As-Built Drawings: The Cost Comparison
A common question is whether Scan-to-BIM is more expensive than hiring a drafter to measure and draw the building manually. For small, simple projects, traditional measuring may have a lower upfront cost. For anything over 3,000 sq ft, or any project requiring a 3D model, Scan-to-BIM is typically cost-competitive with traditional methods — and dramatically more accurate.
The calculation changes entirely when you factor in the cost of measurement errors. A single rework event on a renovation project typically costs $5,000–$20,000. Scan-to-BIM eliminates virtually all measurement error. For any project where the cost of getting it wrong exceeds the cost of the scan, LiDAR is the economically rational choice.
What's Included in a SmartScanz Scan-to-BIM Quote
Every SmartScanz Scan-to-BIM quote includes: the on-site LiDAR scan with Leica BLK360 Gen2, point cloud registration and processing, Revit model at your specified LOD, DWG floor plan extractions, PDF drawing package, IFC export, and a free walkthrough session at delivery. There are no hidden travel fees for projects in KW, Cambridge, Guelph, Hamilton, or Burlington.
Our process: You tell us your building size, LOD requirement, and deliverable format. We send a free, itemized quote within 24 hours — broken down line by line so you know exactly what you're paying for before we set foot on site.
Get a free, itemized Scan-to-BIM quote within 24 hours. No commitment. Serving Kitchener-Waterloo, Cambridge, Guelph, Hamilton, Burlington, and the GTA.
Get a Free Quote →
Comparison
Matterport vs. LiDAR Scanning: Why They're Not the Same Thing
March 2026
SmartScanz Editorial
8 min read
If you've been researching 3D scanning options for your renovation, construction, or documentation project, you've almost certainly encountered Matterport. It's beautifully marketed, visually impressive, and increasingly popular with real estate agents and property managers. But if you're an architect, contractor, engineer, or insurance adjuster who needs data you can actually build on — Matterport and professional LiDAR scanning are not interchangeable. This article explains why, clearly and without jargon.
What Matterport Actually Is
Matterport is a consumer-grade 3D imaging platform built primarily for virtual tours. It uses a combination of infrared depth sensors and standard cameras to create a "dollhouse" walkthrough experience — the kind you see on real estate listings where you can virtually navigate through a home. The output is visually polished and immediately shareable via a web link. For showing a property to a potential buyer or tenant, it's genuinely excellent.
What Matterport is not, and was never designed to be, is a survey-grade measurement tool. Its depth sensors achieve accuracy in the range of ±1–3 centimetres under good conditions — and significantly worse in low light, near reflective surfaces, or in large open spaces. That's enough for a real estate tour where no one is taking measurements. It is not enough for a renovation contractor who needs to know whether a structural wall is 3.65 metres or 3.72 metres from the adjacent column.
The core difference: Matterport creates an experience. LiDAR creates a dataset. One is for looking at a building. The other is for building on the data.
What Professional LiDAR Scanning Actually Is
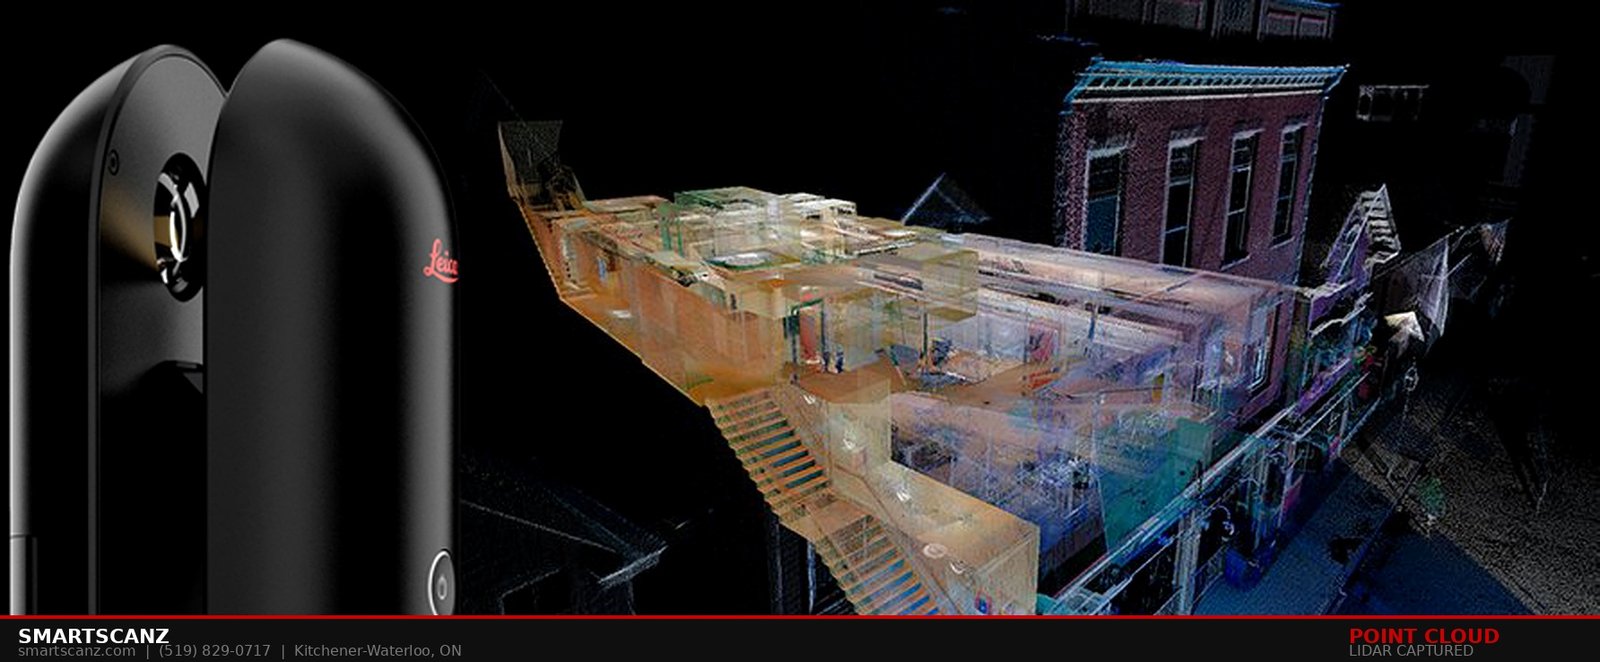
Professional terrestrial LiDAR scanners — like the Leica BLK360 Gen2 used by SmartScanz — fire millions of laser pulses per second in a full 360° sphere. Each pulse travels outward, strikes a surface, and returns to the sensor. The scanner measures the precise time-of-flight of each pulse to calculate the exact X, Y, and Z coordinates of every surface point it hits. A single scan position captures tens of millions of measurements in under two minutes, with a rated accuracy of ±4mm at standard survey distances.
The result is a point cloud — not a visual tour, but a dimensionally accurate, fully measurable 3D dataset. Every wall thickness, ceiling height, column position, door offset, and structural element is captured with the same precision a licensed surveyor would achieve with a total station — but in a fraction of the time and at a fraction of the cost.
±4mmLeica BLK360 Gen2 Accuracy
±1–3cmTypical Matterport Accuracy
10–15×LiDAR More Accurate
The Accuracy Gap — And Why It Matters
A 1–3 centimetre accuracy range sounds small. On a real estate tour, it is irrelevant. On a construction or renovation project, it can be catastrophic.
Consider a straightforward scenario: you're renovating a commercial office floor in Hamilton. The mechanical engineer needs as-built drawings to design a new HVAC layout. The drawings show a corridor at 2.4 metres wide. The Matterport scan suggests it's 2.38 metres. The engineer designs the ductwork around 2.4 metres. The contractor installs it. The duct doesn't fit because the corridor is actually 2.36 metres — within Matterport's stated accuracy range, but 4 centimetres off the drawing.
Demolition. Modification. Rescheduling. That 2-centimetre discrepancy just cost several thousand dollars and a week of delay. A LiDAR scan would have captured that corridor at 2.362 metres — accurate to ±4mm — and the ductwork would have fit on the first attempt.
The Deliverable Problem
Beyond accuracy, the deliverables are fundamentally different. Matterport produces a web-hosted virtual tour and a basic floor plan schematic. These are useful for marketing and rough space planning, but they are not CAD-ready, BIM-compatible, or accepted by most engineers and architects as a basis for design.
Professional LiDAR scanning produces a point cloud — a raw dataset that can be delivered as RCP, E57, or LAS files — plus fully dimensioned DWG floor plans, Revit BIM models at your required Level of Detail, exterior elevation drawings, section cuts, and PDF drawing packages. These deliverables integrate directly into AutoCAD, Revit, SolidWorks, and every other professional AEC workflow. They are accepted by structural engineers, permit offices, insurance adjusters, and construction teams without caveat.
Where Matterport Actually Makes Sense
To be fair to Matterport: it is genuinely good at what it was designed for. If you're a real estate agent wanting an immersive virtual tour of a listing, Matterport is an excellent and cost-effective tool. If you're a property manager doing a basic visual record of a unit's condition at lease start, Matterport works well. If you're doing early-stage conceptual design and need a rough spatial impression of a building you haven't visited yet, a Matterport scan gives you that quickly.
The problem isn't Matterport itself — it's when Matterport scans are used as a substitute for proper as-built documentation on projects that require accuracy. This happens more than it should, because Matterport's outputs look authoritative. The dollhouse view, the floor plan, the ability to take measurements inside the tour — all of it creates the impression of precision that the underlying data doesn't actually support.
Our rule of thumb: If a human being is going to make a decision about construction, renovation, structural design, permitting, or insurance based on the scan data — use LiDAR. If the scan is purely for visual purposes — Matterport is fine.
The Cost Comparison
Matterport scans are often cheaper upfront than professional LiDAR scanning. A Matterport service provider might charge $200–$600 for a residential property scan. A professional LiDAR scan of the same property, delivered as a fully dimensioned DWG floor plan set, typically costs more. This is a real difference and it matters for budget-constrained projects.
But the upfront cost comparison misses the most important number: the cost of a measurement error discovered mid-construction. On a $150,000 renovation, a single discrepancy that triggers rework costs $7,500–$22,500 on average. The premium for professional LiDAR scanning is typically a fraction of that. The scan pays for itself the first time it prevents a change order — and on projects of meaningful complexity, that's not a hypothetical. It's an expectation.
A Direct Comparison
Here's how the two technologies compare across the dimensions that matter for professional use:
| Feature |
LiDAR (Leica BLK360 Gen2) |
Matterport Pro3 |
| Accuracy | ±4mm | ±1–3cm |
| CAD-Ready Output | ✓ DWG / DXF / PDF | Limited / Extra cost |
| Revit BIM Model | ✓ LOD 200–400 | ✗ |
| Point Cloud (E57/LAS) | ✓ | Limited export |
| Virtual Tour | — Not primary use | ✓ Excellent |
| Accepted for Permits | ✓ | ✗ |
| Insurance / Legal Use | ✓ | ✗ |
| Best For | Construction & AEC | Real Estate Tours |
The Bottom Line
Matterport is a marketing tool that happens to capture space. LiDAR is a measurement tool that happens to produce visuals. If your project involves architects, engineers, contractors, permits, insurance adjusters, or any decision-maker who needs to rely on the spatial data — you need LiDAR. If your project involves showing a space to someone who needs to visualize it — Matterport is fine.
At SmartScanz, we use the Leica BLK360 Gen2 — professional-grade terrestrial LiDAR that achieves ±4mm accuracy on every scan. We don't offer Matterport because our clients are building things, not touring them.
If you're in Kitchener-Waterloo, Cambridge, Guelph, Hamilton, Burlington, or the GTA and need scan data you can actually build on — SmartScanz provides free, itemized quotes within 24 hours.
Get a Free Quote →
Buyer's Guide
How to Hire a LiDAR Scanning Company: 7 Questions to Ask
March 2026
SmartScanz Editorial
6 min read
The market for LiDAR scanning and as-built documentation services has grown quickly across Ontario. There are now dozens of companies offering some version of 3D scanning — from solo operators with handheld scanners to large national firms. For an architect, contractor, engineer, or property owner trying to hire the right partner, the differences between providers are not always obvious from a website or a quote. These 7 questions will help you cut through the noise and find a company that will actually deliver.
1. What scanner do you use — and why does it matter?
Not all 3D scanners are created equal. There is a significant difference in accuracy, speed, and data quality between consumer-grade scanners (like Matterport) and professional-grade LiDAR equipment (like the Leica BLK360 Gen2, FARO Focus, or Trimble X7). Ask any prospective company what specific equipment they use and what its rated accuracy is. A professional firm should be able to tell you their scanner's positional accuracy spec — which for a Leica BLK360 Gen2 is ±6mm at 10 metres, with registered point cloud accuracy typically achieving ±4mm under standard conditions.
Red flag: If a company can't name their scanner or describe its accuracy spec, they are likely using consumer-grade equipment that is not suitable for as-built documentation, permitting, or Scan-to-BIM work.
2. What deliverables do you provide — and in what formats?
The raw point cloud is just the starting point. A capable scanning company should be able to deliver whatever your workflow requires: RCP files for AutoCAD, RVT files for Revit, E57 or LAS for open point cloud workflows, 2D DWG floor plans and elevations, PDF drawing packages, IFC files for open BIM, and more. Before signing any contract, confirm that the company can deliver files in the exact format your architect, engineer, or contractor needs — and that those files are ready to use without additional cleanup.
3. What Level of Detail (LOD) do you model to?
For Scan-to-BIM projects, LOD matters enormously. LOD 200 captures overall geometry and massing — fine for early design. LOD 300 adds precise dimensions and element quantities — required for construction documentation. LOD 350 includes connection details for structural and MEP coordination. LOD 400 is fabrication-level detail. A scanning company that cannot explain LOD clearly — or that defaults to one level for every project — may not have the modelling expertise your project demands.
4. Do you do the modelling in-house or outsource it?
Many scanning companies outsource their BIM modelling to overseas teams. This is not inherently wrong, but it introduces communication delays, quality control risks, and potential mismatches between the scan data and the final model. Ask directly: who builds the Revit model? Are they on your team? What is your quality control process before delivery? A company that models in-house can typically respond faster to revision requests and catch errors before they reach you.
5. Can you show me examples of comparable projects?
Portfolio samples are the most direct evidence of capability. Ask to see examples of projects similar to yours in type (residential, commercial, heritage, industrial), size, and deliverable (floor plan, Revit model, elevation drawings). Look at the quality of the drawings — are dimensions legible? Are wall thicknesses realistic? Do the 3D models look clean and coordinated? A company that cannot show you relevant examples may not have delivered that type of work before.
6. What is your turnaround time and what is included in the quote?
Get clarity on turnaround before you sign. A typical residential as-built scan should be completable within 5–10 business days from site visit to final deliverable. Commercial and industrial projects may take longer depending on complexity. Also confirm what the quote includes: How many scan positions? How many revisions? Is the walkthrough session included? Are travel costs extra? Vague quotes lead to scope disputes — a professional company provides itemized, transparent pricing upfront.
5–10Days Typical Turnaround
24hrQuote Turnaround
±4mmExpected Accuracy
7. Are you local — and does that matter?
For projects in Kitchener-Waterloo, Cambridge, Guelph, or Hamilton, hiring a local scanning company matters more than it might seem. A local team can mobilize faster, respond to scope changes or site access issues on short notice, and build a real working relationship with your team across multiple projects. A Toronto or national company targeting KW as a side market adds travel costs, scheduling delays, and a team that doesn't know the local building stock or permit requirements.
The bottom line: The right LiDAR scanning partner is one that can name their equipment, explain their workflow, show you comparable work, and deliver exactly the files you need — on time, with no surprises on the invoice. If a company hesitates on any of the seven questions above, keep looking.
SmartScanz answers all seven of these questions upfront — and we provide free, itemized quotes within 24 hours. Based in Kitchener-Waterloo, serving KW, Cambridge, Guelph, Hamilton, Burlington, and the GTA.
Get a Free Quote →
Industry Insight
LiDAR Scanning vs. Traditional Measuring: The True Cost of Getting It Wrong
March 2026
SmartScanz Editorial
7 min read
Every construction and renovation project starts with measurements. The question is not whether you need accurate spatial data — you do, always — but how you get it. For decades, the industry default was a person with a tape measure, a laser distance meter, and a field sketch. LiDAR scanning has changed that equation permanently. This article breaks down exactly what each method costs, where each method fails, and why the math almost always favours scanning once you account for the true cost of getting it wrong.
How Traditional Measuring Works
Traditional field measuring involves a technician or drafter walking through a space with a tape measure, laser distance meter, and notebook. They sketch room layouts by hand, record dimensions on paper or a tablet, and return to the office to draft those measurements into CAD or provide them to an architect. On a straightforward single-floor space, an experienced measurer can complete a basic floor plan in a few hours. On a multi-floor building with complex geometry — curved walls, irregular rooms, sloped ceilings, structural projections — the same process can take days, and the margin for error grows with every measurement recorded by hand.
The fundamental problem: Every manual measurement introduces human error. A misread tape, a sketched dimension that gets transposed during drafting, a wall thickness that was estimated rather than measured — each one is invisible in the final drawing until it causes a problem in the field.
How LiDAR Scanning Works
A LiDAR scanner fires millions of laser pulses per second in a full 360° sphere. Each pulse travels outward, strikes a surface, and returns to the sensor in nanoseconds. By measuring the precise time-of-flight of every pulse, the scanner calculates the exact X, Y, and Z coordinates of that surface point. A single scan position captures tens of millions of measurements in under two minutes. A full building is typically captured in one site visit — no return trips, no re-measurement, no field sketches. The result is a point cloud: a complete, dimensionally accurate digital replica of the space.
The Hidden Costs of Traditional Measuring
The invoice for traditional measuring looks cheaper. A drafter charging $75–$150 per hour for a day of field work appears less expensive than a LiDAR scan. But that comparison ignores all the costs that never appear on the measurer's invoice.
Return visits. Traditional measuring almost always requires at least one return visit. A dimension was missed. A room was inaccessible during the first visit. The architect found a discrepancy and needs it verified. Each return visit costs travel time, scheduling time, and billable hours — and delays the project.
Drawing errors discovered in construction. When a measured drawing contains an error and that error isn't discovered until demolition or framing has begun, the cost is not a corrected drawing — it is rework. Rework in construction typically costs 5–15% of total project value. On a $200,000 renovation, that is $10,000–$30,000 in costs that trace directly back to inaccurate as-built documentation.
Scope creep from surprises. When drawings don't accurately reflect existing conditions, contractors encounter surprises mid-project — walls in the wrong place, structural elements that weren't captured, floor heights that don't match the drawing. Each surprise triggers a change order. Change orders delay schedules and inflate budgets.
5–15%Typical Rework Cost
±4mmLiDAR Accuracy
1 VisitAll Data Captured
A Real-World Comparison
Consider a 3,000 sq ft two-storey commercial renovation in Kitchener. Traditional measuring might cost $800–$1,500 for a day of field work plus drafting. A LiDAR scan of the same space, delivering a fully dimensioned DWG floor plan set, might cost $1,500–$2,500. On paper, traditional measuring is cheaper by $500–$1,000.
Now consider what happens when the traditional drawings contain a 4-inch wall position error that isn't discovered until the framing contractor has already built two partition walls in the wrong location. Demolition and rebuild of those walls costs $3,500. The architect's time to review and revise the drawings costs $800. The project is delayed by four days, costing the client $2,000 in holding costs. Total cost of the error: $6,300 — which is four times what the LiDAR scan would have cost.
This scenario is not hypothetical. It happens on renovation projects across Ontario every week. The question is not whether measurement errors occur with traditional methods — they do, consistently. The question is whether your project budget can absorb the cost when they do.
When Traditional Measuring Still Makes Sense
Traditional measuring is not always wrong. For very simple, single-room projects — a bathroom renovation where the only deliverable is a rough sketch of existing dimensions — a tape measure is perfectly adequate. For projects where sub-centimetre accuracy is not required and no BIM model is needed, the cost difference may not be justified. The key is being honest about the complexity of your project and the consequences of an error. The more complex the space, the more stakeholders relying on the drawings, and the higher the cost of rework — the more clearly LiDAR scanning wins the cost-benefit analysis.
The Bottom Line
The true cost of traditional measuring is not the invoice from the drafter. It is the invoice from the drafter plus the expected cost of errors, multiplied by the probability of those errors occurring on your specific project. For any renovation or documentation project of meaningful complexity, LiDAR scanning is not a premium — it is insurance. And unlike most insurance, it delivers something useful even when nothing goes wrong: a complete, accurate, permanently measurable digital record of your building.
SmartScanz provides free, itemized quotes within 24 hours. We serve Kitchener-Waterloo, Cambridge, Guelph, Hamilton, Burlington, and the Greater Toronto Area.
Get a Free Quote →
Scan-to-BIM
Before & After: How LiDAR Transforms a Building into a BIM Model
March 2026
SmartScanz Editorial
7 min read
Most people understand what a finished BIM model looks like — a clean, coordinated 3D digital building ready for construction documentation, clash detection, or facility management. What most people have never seen is what happens in the hours and days between a LiDAR scanner sitting in the middle of an empty room and that polished model appearing on an architect's screen. This article walks you through the entire journey, step by step.
Step 1 — The Site Visit (Before Anything Exists)
It starts with a single scanner, a tripod, and a site. Our team positions the Leica BLK360 Gen2 at strategic locations throughout a building — typically one scan position every 5 to 10 metres, depending on the complexity of the space. Each scan takes under two minutes and captures tens of millions of laser measurements in a full 360° sphere, including floor, ceiling, walls, windows, doors, mechanical equipment, and every architectural feature in between.
On a typical residential project: We complete 8–15 scan positions in a single morning. A commercial floor plate might require 20–40 positions. Every point captured is accurate to within ±4mm — without a single tape measure leaving our kit bag.
Step 2 — Registration (Stitching the Scans Together)
Each individual scan sees the world from its own position. Registration is the process of aligning all scans into a single, unified coordinate system. Using Leica's Cyclone REGISTER 360 software, our team automatically matches overlapping geometry between adjacent scan positions — columns, walls, floor edges — until every scan locks into place with sub-millimetre precision. The result is a complete, seamless point cloud of the entire building.
2 minPer Scan Position
±4mmRegistration Accuracy
1 VisitAll Data Captured
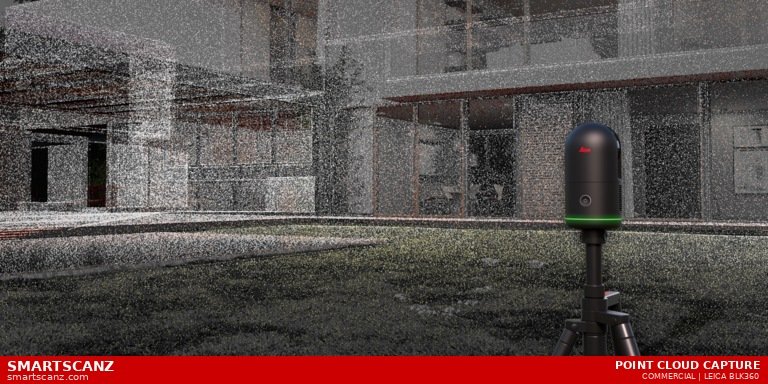
Step 3 — The Point Cloud (The Raw "Before")
At this stage, the building exists as a point cloud — billions of individual coloured dots suspended in 3D space, each one representing a precise real-world surface. To the untrained eye it looks like a photograph. To an engineer or architect, it is a fully measurable, interrogatable replica of the building. You can slice through it at any height to reveal a floor plan. You can cut a section to see wall thicknesses. You can measure any distance between any two points anywhere in the model — instantly, without returning to site.
Step 4 — BIM Modeling in Revit (The Transformation)
This is where the point cloud becomes a BIM model. Our team imports the registered point cloud directly into Autodesk Revit, where it acts as a precise, three-dimensional tracing guide. Walls, floors, ceilings, columns, beams, doors, windows, stairs, and mechanical elements are modeled by tracing the geometry revealed by the point cloud — not guessing, not measuring manually, but following laser-accurate data point by point.
Step 5 — Quality Control & Delivery
Before any file leaves our studio, every modeled element is checked against the point cloud for deviation. We then deliver your project as a native Revit RVT file, an IFC for open BIM workflows, 2D DWG drawings extracted from the model, and a PDF drawing package — all in a single delivery within 5–10 business days of the site visit.
Want to see the before and after on your building? SmartScanz provides free quotes within 24 hours and serves Kitchener-Waterloo, Cambridge, Guelph, Hamilton, Burlington, and the Greater Toronto Area.
Get a Free Quote →
LiDAR Technology
What is LiDAR Scanning — and Why Does It Matter?
February 2025
SmartScanz Editorial
5 min read
If you've ever hired a contractor to measure a space and received drawings that were off by several inches — or worse, discovered discrepancies mid-construction — you've experienced the cost of traditional measurement methods. LiDAR scanning was built to eliminate that problem entirely.
What Does LiDAR Stand For?
LiDAR stands for Light Detection and Ranging. The technology works by firing millions of laser pulses per second in all directions from a scanner positioned in a room or exterior space. Each pulse travels outward, strikes a surface, and bounces back to the sensor. By measuring the time each pulse takes to return — and the angle it was fired at — the scanner calculates the precise X, Y, and Z coordinates of that surface point in 3D space.
In practical terms: A single LiDAR scan can capture tens of millions of individual measurements in under two minutes — producing a digital model of a space that is accurate to within 2 millimetres.
How Accurate Is It Really?
The scanners we use at SmartScanz — including FARO, Leica, and Trimble equipment — achieve positional accuracy of ±4mm under standard conditions. For context, the width of a Canadian dime is approximately 1.75mm. That level of precision is impossible to achieve with tape measures, laser distance meters, or even total stations under typical field conditions.
0.05mmScanner Resolution
±4mmPositional Accuracy
360°Full Coverage
What Happens After the Scan?
The raw output of a LiDAR scan is called a point cloud — a massive collection of 3D data points that together form a precise digital replica of the scanned space. From that point cloud, our team can produce as-built floor plans, exterior elevations, Scan-to-BIM Revit models, sections, and more — all derived from a single site visit.
Who Uses LiDAR Scanning?
LiDAR scanning is used across architecture, construction, engineering, insurance, heritage preservation, and facility management. Any professional who needs accurate spatial data — and can't afford the cost of errors — benefits from LiDAR. In the Kitchener-Waterloo region, we work with architects renovating century-old commercial buildings, manufacturers documenting complex equipment layouts, and insurance adjusters documenting property damage.
Why Not Just Use Photographs?
Photographs capture appearance. LiDAR captures geometry. A photograph can tell you what a room looks like. A LiDAR scan tells you exactly how large every surface is, where every wall, column, and fixture sits in 3D space, and how everything relates to everything else — to within millimetres. These are fundamentally different types of information.
Ready to see what LiDAR can do for your project? We provide free quotes within 24 hours and can mobilize across Kitchener-Waterloo and the surrounding region.
Get a Free Quote →
BIM & Modeling
Scan-to-BIM Explained: From Point Cloud to Revit Model
February 2025
SmartScanz Editorial
6 min read
Building Information Modeling — BIM — has transformed how architects, engineers, and contractors design and manage buildings. But BIM is only as useful as the data that feeds it. For existing buildings, that data has historically been expensive and time-consuming to collect accurately. Scan-to-BIM changes that equation completely.
What is Scan-to-BIM?
Scan-to-BIM is the process of converting a LiDAR point cloud — a precise 3D capture of an existing building — into a fully coordinated Building Information Model, typically built in Autodesk Revit. Instead of manually measuring every wall, ceiling, column, window, and door by hand, we scan the building in a single visit and use that data to build a parametric digital model that matches the real structure exactly.
The key advantage: A Scan-to-BIM model is derived from reality. It reflects what the building actually is — not what it was designed to be or what someone estimated from memory.
What is LOD — and Which Level Do You Need?
In BIM, Level of Detail (LOD) describes how much information is modeled. The scale runs from LOD 100 (conceptual massing only) to LOD 500 (as-built with full asset data). For most renovation and retrofit projects, LOD 200 to LOD 350 is sufficient. For facility management and complex MEP coordination, LOD 400 is often required.
At SmartScanz, we deliver models from LOD 200 through LOD 400 depending on project requirements. We discuss LOD requirements during scoping so you receive exactly what your workflow demands — no more, no less.
What Can You Do With a Scan-to-BIM Model?
A properly built Revit model derived from a LiDAR scan gives your team the ability to design renovations with confidence, run clash detection before construction begins, coordinate structural, architectural, and MEP systems in a single model, extract accurate quantities for cost estimation, and hand off a reliable as-built record to facilities management teams. Each of these applications depends on the model accurately representing the real building — which is only possible when the model is built from measured scan data.
How Long Does It Take?
Scanning a typical commercial floor plate of 5,000 to 10,000 square feet takes two to four hours on site. Point cloud registration and cleaning adds another day. Revit modeling time depends on scope and LOD — most projects are delivered within five to ten business days from the scan date.
LOD 200–400Model Detail Range
5–10Days to Deliver
IFC / RVTFile Formats
Revit, IFC, or Both?
We deliver native Revit (.RVT) files by default. For clients using non-Autodesk platforms such as ArchiCAD, Vectorworks, or Tekla, we export to IFC format — an open standard that maintains full model geometry and metadata. We can also deliver DWG exports from Revit for CAD-based workflows.
Have an existing building that needs a Revit model? We scan, register, and model — delivering files your team can use immediately.
Start Your Scan-to-BIM Project →
Data & Processing
What is a Point Cloud? The Foundation of Every Scan We Deliver
February 2025
SmartScanz Editorial
4 min read
Every deliverable we produce at SmartScanz — whether it's a floor plan, a Revit model, or a property damage report — begins with the same raw material: a point cloud. Understanding what a point cloud is, and what makes a good one, is the first step to understanding the value of LiDAR-based documentation.
The Definition
A point cloud is a collection of individual data points in three-dimensional space. Each point has three coordinates — X, Y, and Z — that define its exact position. A single LiDAR scan of a residential home might capture 200 million to 500 million individual points. A large commercial facility might produce several billion. Together, these points form a dense, precise digital replica of the scanned space.
Think of it this way: If a photograph is a 2D image of how a space looks, a point cloud is a 3D record of exactly where every surface in that space is located — measurable from any angle, at any scale.
What Does a Point Cloud Look Like?
Viewed in software like Autodesk ReCap or Leica Cyclone, a point cloud looks like a dense constellation of coloured dots that together form recognizable shapes — walls, floors, ceilings, columns, equipment. The density of points varies by distance from the scanner: surfaces closer to the scanner are captured in higher density than surfaces far away. Our processing workflow compensates for this variation to produce clean, uniform output.
What File Formats Are Delivered?
Point clouds are delivered in industry-standard formats depending on your workflow. RCP (Autodesk ReCap Project) files integrate directly with Revit, AutoCAD, and Civil 3D. E57 is an open-standard format compatible with most professional point cloud viewers and modeling platforms. LAS and LAZ formats are used in geospatial and survey workflows. We discuss format requirements during scoping and deliver in the format your team actually uses.
Raw vs. Processed Point Clouds
A raw point cloud — fresh out of the scanner — contains noise: stray points from reflective surfaces, moving objects captured mid-scan, and registration errors between scan positions. Our processing workflow removes noise, registers multiple scan positions into a single unified coordinate system, and delivers a clean point cloud ready for modeling or direct measurement. This processing step is what separates usable data from unusable data — and it's where a significant portion of the value we provide is created.
RCPAutodesk Format
E57Open Standard
LAS/LAZGeospatial Format
Can You Just Give Me the Point Cloud?
Absolutely. Not every client needs a fully modeled deliverable. If you have the in-house capability to work with point cloud data directly — using Revit, AutoCAD, ReCap, or a similar platform — we can scan, register, and deliver a clean point cloud and step back. Our point cloud processing service is designed precisely for clients who need clean data but handle the downstream modeling themselves.
Need a clean, registered point cloud delivered fast? We scan, process, and deliver — anywhere in the Kitchener-Waterloo region.
Request Point Cloud Processing →
As-Built Documentation
As-Built Floor Plans with Electrical Documentation: What They Are, What They Cost, and Why Your Project Needs Both
April 2026
SmartScanz Editorial
7 min read
Ask most homeowners or contractors what an as-built floor plan is, and they'll describe something familiar — a dimensioned drawing showing wall layouts, room sizes, and door and window positions. That's correct, as far as it goes. But on renovation and build projects where electrical work is involved, a floor plan without electrical documentation is half a drawing. When an electrician needs to know where every outlet, switch, pot light, exhaust fan, and panel connection sits — and where they need to go — a standard floor plan tells them almost nothing. This article explains what a complete as-built floor plan with electrical documentation actually looks like, how LiDAR scanning makes it possible to capture both in a single site visit, and what you should expect to pay for the deliverable in Ontario.
What Is an As-Built Floor Plan?
An as-built floor plan is a dimensionally accurate drawing of a building as it currently exists — not as it was originally designed, and not as someone estimated it from memory. It reflects the real walls, real room dimensions, real ceiling heights, and real locations of structural and architectural features captured through physical measurement. On any renovation, addition, insurance, or permitting project, the as-built floor plan is the document everything else is built on. If it's wrong, everything downstream is wrong.
Traditional as-built floor plans are produced by a drafter with a tape measure who walks the space, records dimensions by hand, and returns to the office to produce a CAD drawing. This process works for simple, single-floor spaces. It fails — consistently — on multi-floor buildings, complex room geometry, and any project where sub-centimetre accuracy is required.
LiDAR-based as-built floor plans are derived directly from a registered point cloud. Every wall position, room width, ceiling height, and architectural feature is captured by laser at ±4mm accuracy and extracted into a CAD drawing without a single manual measurement. The result is a floor plan your architect, contractor, or engineer can actually rely on.
What Is an RCP — and Why Does Electrical Documentation Need One?
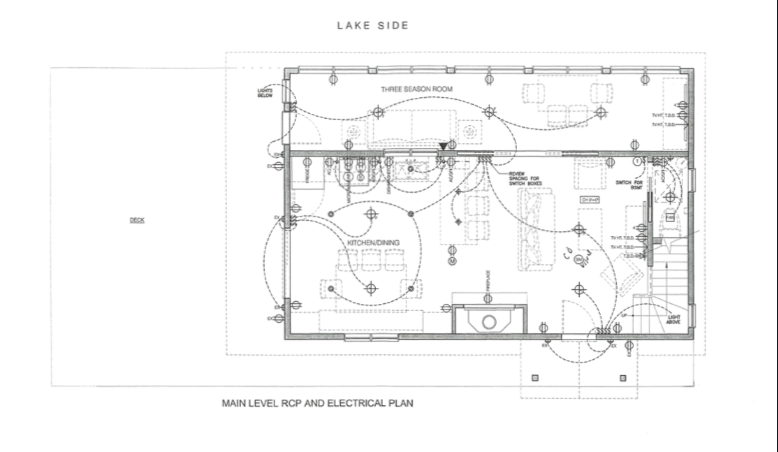
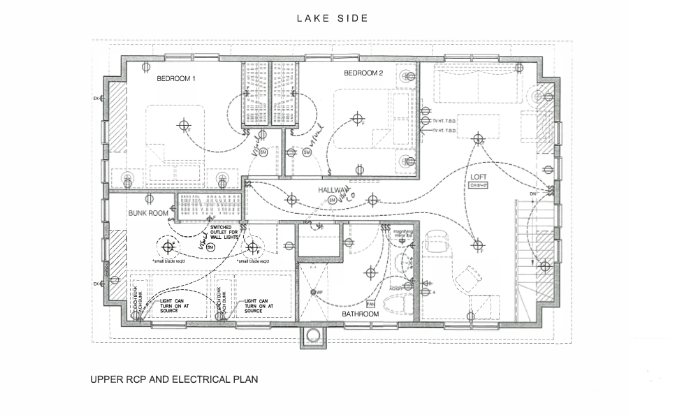
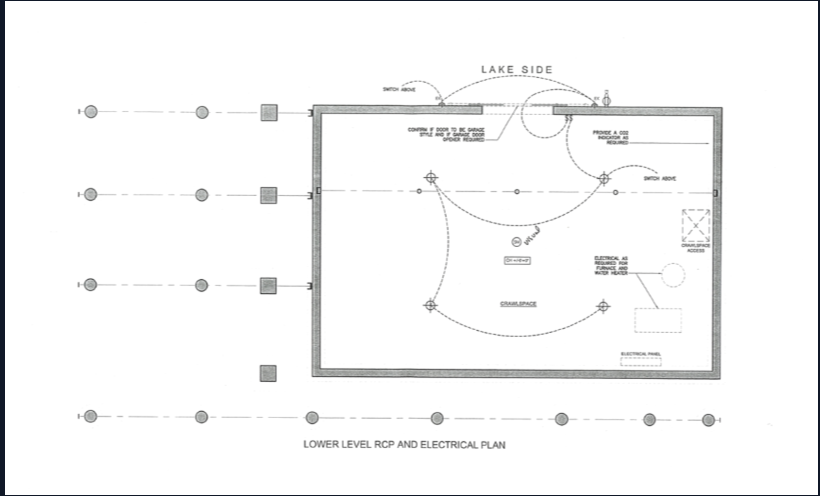
A Reflected Ceiling Plan — or RCP — is a drawing that shows what you would see if you laid a mirror on the floor and looked up. It captures ceiling height, light fixture positions, exhaust fans, smoke detectors, and any ceiling-mounted equipment — all referenced to the floor plan below. The RCP is the foundation of electrical documentation. Without it, there is no accurate record of where lighting circuits are laid out, how fixtures relate to the rooms below them, or what ceiling heights apply to each space.
A complete electrical documentation package combines the RCP with the electrical plan — which adds outlet locations, switch positions, panel locations, GFI circuits, dedicated circuits for appliances, and inter-connections between fixtures and their switching points. Together, the RCP and electrical plan give every trade involved in a renovation a complete, coordinated picture of what exists and what needs to change.
The key point: An as-built floor plan shows where the walls are. An RCP and electrical plan shows what's in those walls, on those ceilings, and in every junction box — and exactly where all of it is located.
What a Complete Electrical Documentation Package Looks Like
A complete RCP and electrical package covers every level of the building independently, with each floor plan showing the full lighting layout, switch positions, outlet documentation, panel and mechanical electrical connections, smoke and CO detector locations, and any specialized circuits such as TV rough-ins, voice/data outlets, and home automation components.
Lighting layout. Every pot light, pendant fixture, exhaust fan with light, wall sconce, and strip light — positioned with dimensions from the center of each fixture, tagged with ceiling height where it varies.
Switch positions. Every wall switch, including multi-way switching arrangements where a single circuit is controlled from multiple locations — common in stairwells, hallways, and bedrooms.
Outlet documentation. Every duplex outlet, GFI outlet, above-counter outlet, millwork-integrated outlet, and dedicated appliance circuit — located and tagged. For kitchens, this includes dedicated circuits for refrigerators, microwaves, dishwashers, and ranges. For bathrooms, GFI protection zones are explicitly noted.
Panel and mechanical electrical. The location of the electrical panel, dedicated circuits for furnaces, water heaters, air conditioning units, and any other mechanical equipment requiring electrical service.
Smoke and CO detectors. Required under the Ontario Building Code — locations documented per floor.
±4mmLiDAR Capture Accuracy
3 LevelsDocumented in 1 Visit
DWG / PDFDelivery Formats
How LiDAR Scanning Captures All of This in One Visit
A traditional approach to electrical documentation requires a drafter to walk every floor, manually locate and dimension every fixture, outlet, and switch by hand, then return to the office to draft each floor separately. On a multi-floor building with complex electrical layouts, that process takes days and introduces significant opportunity for omission and error.
LiDAR scanning captures the complete geometry of every floor in a single site visit. Our team positions the Leica BLK360 Gen2 throughout the building, capturing walls, ceilings, floors, and all visible surface-mounted electrical elements in a full 360° point cloud. Ceiling heights are extracted directly from the scan data. Fixture positions are located from the point cloud to within ±4mm. The registered, multi-floor point cloud then becomes the base from which floor plans, RCPs, and electrical plans are all drafted — simultaneously, in a single coordinated drawing set.
The practical advantage: Because every floor is captured in the same coordinate system, multi-floor electrical elements — stairwell switching, circuits that run between floors, panel locations in lower levels — are documented with precise vertical and horizontal relationships. Nothing is estimated. Nothing is assumed.
Pricing for As-Built Floor Plans with Electrical Documentation in Ontario
Pricing depends on building size, number of floors, and the complexity of the electrical system being documented. The following ranges include the LiDAR scan, point cloud processing, dimensioned as-built floor plans, RCP per floor, and electrical plan per floor delivered as DWG and PDF.
| Building Type |
Floors |
Typical Range |
| Small residential |
1–2 floors |
$900 – $1,800 |
| Medium residential |
2–3 floors |
$1,800 – $3,200 |
| Large residential / cottage |
3+ floors |
$3,000 – $5,000 |
| Small commercial |
1–2 floors |
$1,500 – $3,500 |
| Medium commercial |
2–4 floors |
$3,500 – $8,000 |
What drives the cost up: High fixture density, multiple sub-panels, complex multi-way switching, and millwork-integrated electrical requiring shop drawing cross-reference.
What drives the cost down: Simple residential layouts with standard room-by-room circuits, lower floor counts, and PDF-only output rather than editable DWG files.
Who Needs This Deliverable — and When
Renovation contractors working on older residential or commercial buildings where original electrical drawings don't exist or don't reflect what was actually installed. Before any electrical rough-in or panel upgrade, you need to know what's there.
Interior designers and lighting consultants specifying new fixture layouts need the existing RCP as a base. Without an accurate as-built RCP, every lighting specification is made against an estimate — and estimates produce change orders.
Insurance adjusters and property managers documenting a building's condition following purchase, damage, or change of tenancy. An electrical documentation package is a defensible, timestamped record of what the building contained.
Architects and engineers working on building additions, tenant improvements, or change-of-use permits where the electrical system needs to be assessed against OBC requirements.
Homeowners planning significant renovations who want a complete record of their building's existing electrical layout before walls are opened — and a verified record after the work is done.
The SmartScanz Deliverable
A SmartScanz as-built floor plan and electrical documentation package is delivered as a full DWG drawing set — floor plan, RCP, and electrical plan per level — plus a PDF drawing package and point cloud in your preferred format. All drawings are dimensioned, all electrical elements are tagged using standard legend notation, and all ceiling heights are annotated from scan data rather than estimated. Delivery is within 5–10 business days of the site visit.
We serve Kitchener-Waterloo, Cambridge, Guelph, Hamilton, Burlington, and the Greater Toronto Area. For projects outside this region, contact us for a travel assessment — we frequently serve clients across Ontario.
Get a free, itemized quote within 24 hours. No commitment required. Tell us your building size, number of floors, and what you need the drawings for — we'll send you a line-by-line breakdown before we set foot on site.
Get a Free Quote →